
Introduction
Managing multiple email accounts can be quite overwhelming. But worry not, because I have an awesome solution for you! By linking your Hostinger webmail to Gmail, you can bid farewell to the chaos and bring all your emails under one roof. Say hello to simplicity and convenience!
I will show you exactly how to setup Hostinger email on Gmail. So, no more switching between tabs and getting lost in the email maze. Access and control all your emails seamlessly in one place with just a few simple steps.
But before we embark on the journey of linking your Hostinger email to Gmail, let’s make sure we have everything we need.
Here are the necessary conditions to ensure a smooth linking process:
Prerequisites for Linking Hostinger Email to Gmail
Hostinger Email Account
Before proceeding, make sure you have an active Hostinger email account. If you haven’t created one yet, do not worry! Setting up your Hostinger email account is quite easy. Just visit Hostinger’s website and follow the simple steps provided. In no time, you’ll have your own personalized Hostinger email account ready to use!
Hostinger Email Details
Make sure you have your Hostinger email details at hand. Specifically, note down the POP3 (Incoming) and SMTP (Outgoing) settings, including the host, encryption, and port numbers. These details will be used during the setup process to establish a connection between Hostinger and Gmail.
Gmail Account
It is necessary to have a Gmail account. If you do not have a Gmail account, then create it. Simply visit the Gmail website, and follow the instructions to setup your Gmail account.
Internet Connection
Ensure that you have a stable internet connection throughout the setup process. This will ensure uninterrupted communication between Hostinger, Gmail, and your device.
With these prerequisites in place, you’re all set to dive into the exciting world of linking your Hostinger email to Gmail.
So, let’s not waste any more time and dive right in and learn how to set up Hostinger email on Gmail like a pro!
How to Setup Hostinger Email on Gmail?
Step 1: Open Gmail Settings
To begin the setup process, you need to log in to your Gmail account. After that click on the gear icon located in the upper-right corner.

From the drop-down menu, select “Settings” to access the Gmail settings panel. This is where you can customize and manage various aspects of your Gmail account.

Step 2: Navigate to the “Accounts and Import” Tab
In the Gmail settings panel, you will find various tabs. To proceed with the setup click on the “Accounts and Import” tab. Here, you can manage your email accounts, import emails from other accounts, and set up email forwarding.
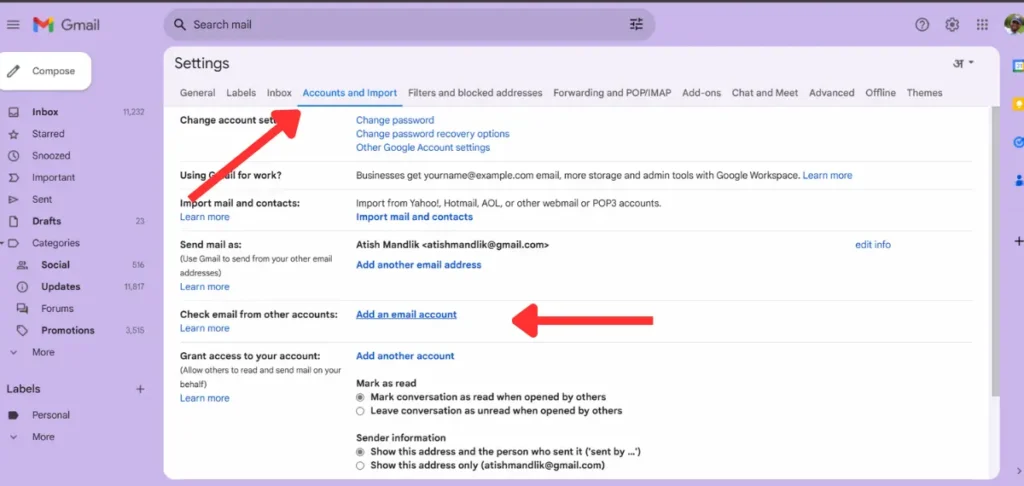
Step 3: Add Your Hostinger Email Account
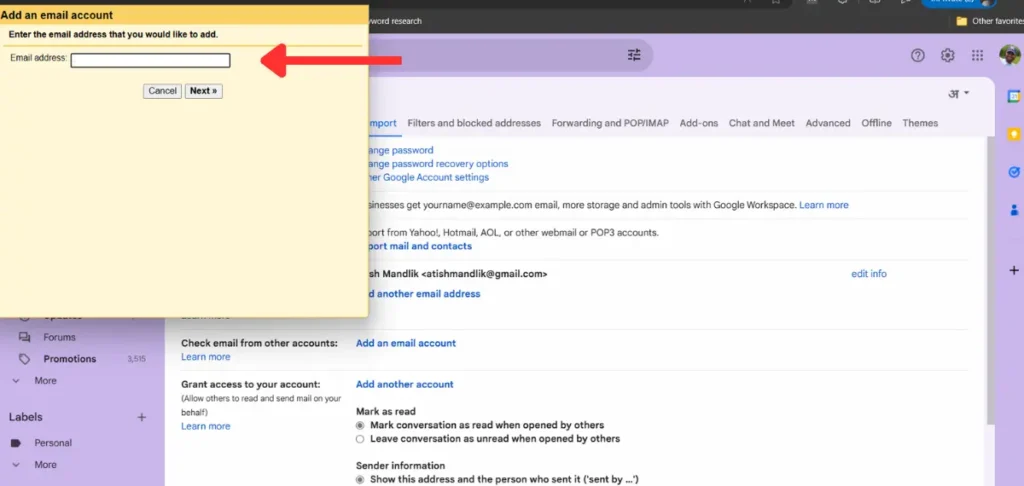
Under the “Check mail from other accounts” section, you will see an option to “Add a mail account.” Click on this button.
A new window will pop up, prompting you to enter your Hostinger email address. Type in your full Hostinger email address and click “Next” to continue.
H3 Step 4: Select Import Options
A window will pop up, offering you Import emails from my other account (POP3).
This option is a real game-changer if you want to bring all your existing Hostinger webmail emails into Gmail. You can decide whether to import emails from the last 30 days or go all-in and import every single email. This option helps you keep all your emails in one convenient place.

Choose the options and click “Next” to proceed.
Step 5: Configure Server Settings
Then configure the server settings for your Hostinger email account. You will require the following information to do so.
- Username: Your Hostinger email address.
- Password: The password associated with your Hostinger email account.
- POP Server: Enter the Hostinger POP server address (e.g., mail.hostinger.com).
- Port: Use the default POP port, which is 995.
- A secure connection (SSL) when retrieving mail: Check this box to enable SSL for secure email retrieval.
You will get this details at your Hostinger Hpanel in email configuration setting.

Step 6: Confirm Sending Verification Email
To ensure the ownership of your Hostinger email account, Gmail will send a verification email to your Hostinger email address. Open your Hostinger email account in a new tab or window and locate the verification email.
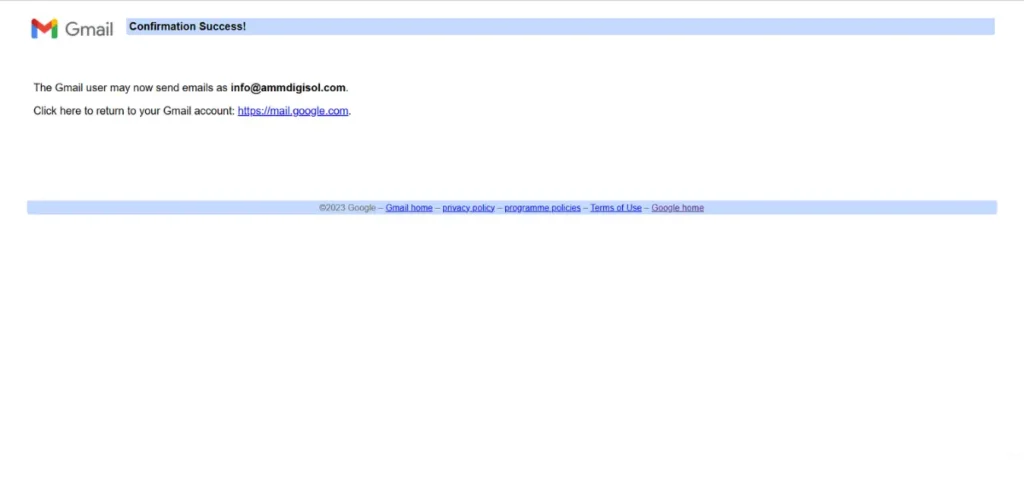
Follow the instructions given in order to verify your account. This step is essential to ensure that you have the authority to access and manage the email account you’re integrating.
Set Up “Send Mail As” Feature (Optional)
If you’re eager to send emails from your Hostinger email address using the convenience of Gmail, you’re in luck! There’s a neat feature called “Send mail as” that lets you maintain a professional image while enjoying Gmail’s user-friendly interface.
To do so follow the following instructions:
Head back to the Gmail settings panel by clicking on the gear icon in the top right corner.
Look for the “Send mail as” section and click on the “Add another email address” link.
Enter your name and your Hostinger email address. Make sure to provide accurate information for a seamless setup.
Now, let’s configure the SMTP server settings to ensure everything runs smoothly. Here’s the breakdown:
- SMTP Server: Enter the Hostinger SMTP server address. It typically looks something like “mail.hostinger.com”.
- Port: Stick with the default SMTP port, which is usually set to 587.
- Username: This is where you need to enter your Hostinger email address. Double-check for any typos!
- Password: Don’t forget to input the password associated with your Hostinger email account. Keep it safe and secure.
- Secured connection using SSL: Enable this option to ensure your email communication is protected by a secure connection.
Once you’ve filled in all the necessary details, click on the “Add Account” button and that’s it.
Now you’re all set to send emails from your Hostinger email address using the ease and familiarity of Gmail. Enjoy the best of both worlds as you effortlessly navigate through the user-friendly Gmail interface while maintaining a professional appearance with your Hostinger email. Get ready to conquer your email communication like a true pro!
Bottom Line
Congratulations! Now you know exactly how to setup Hostinger email on Gmail. By following these step-by-step instructions, you will unlock a seamless and efficient email management experience.
You can access and control all your emails in one place, import existing emails and contacts, and send emails from your Hostinger address using Gmail’s intuitive interface. So, enjoy the convenience of managing all your emails from one unified platform.
Say goodbye to the hassle of switching between email accounts and embrace the simplicity of Hostinger email integrated with Gmail. Streamline your communication, stay organized, and relax with a more productive email experience. Link your Hostinger email to Gmail today and simplify your digital life!